Hair accessories look simple, but making them well is harder than it seems. A bow can look pretty and still feel scratchy. A scrunchie can seem easy until the stitching twists or the elastic bunches. This guide shows how to make DIY hair accessories at home, how to improve the finish, and when handmade production stops making business sense. It also reflects where the category is heading: Grand View Research values the global hair accessories market at USD 23.41 billion in 2024, while Euromonitor says beauty consumers are more intentional, DIY-minded, and value-focused than before.[1][2]

1. Why DIY Hair Accessories Are So Popular
1.1 Why more people are making their own hair accessories
DIY hair accessories sit at the intersection of fashion personalization, at-home beauty, and handmade culture. Grand View Research says the category is expanding because consumers want products that are both functional and fashionable, while the global handicrafts market reached an estimated USD 739.95 billion in 2024, helped by demand for unique, handmade, and eco-conscious goods.[1][3] That makes DIY hair accessories attractive: they are creative, practical, giftable, and relatively affordable to make at home.
Euromonitor adds another layer: DIY beauty is becoming a deliberate lifestyle choice for convenience, control, and cost efficiency, and 77% of DIY users want proven efficacy from at-home products.[2] The mindset carries over to accessories too. People want products that feel personal, useful, and worth keeping.
Etsy’s 2025 seller trend report is based on Etsy search data and industry forecasting. It highlights “tousled ribbon-tied hair” inside its “Messy Coquette” trend and tells sellers to use trend insights to update inventory, tags, titles, photography, and promoted listings.[4] The lesson is simple: DIY hair accessories are not just a hobby. They are part of a search-driven, trend-led market.
1.2 Who DIY hair accessories are best for
DIY hair accessories are a strong fit for beginners, parents, small Etsy sellers, stylists, and gift makers. They are also ideal for testing color, scale, and decoration before committing to larger production. If you want to experiment without factory minimums, DIY is the smartest first step.
| User type | Why DIY works | Best starter project |
|---|---|---|
| Beginners | Low investment, forgiving skills, fast learning loop | Basic scrunchie |
| Gift makers | Easy personalization by color, initials, or embellishment | Ribbon bow clip |
| Small Etsy sellers | Can test demand quickly with short runs and trend-led colors | Pearl or satin barrette |
| Stylists and content creators | Allows exact styling for a shoot, event, or mood board | Statement bow or embellished headband |

2. Basic Materials and Tools You Need
2.1 Core materials: fabric, ribbon, pearls, clips, and glue
The materials you choose determine how your DIY hair accessories look, feel, and last. For soft styles like scrunchies and bows, satin, cotton, velvet, and lightweight twill are common starter fabrics. For structured pieces, grosgrain ribbon, felt backing, acetate parts, or padded inserts create shape. Pearls and beads add value, but they should not create scalp discomfort.
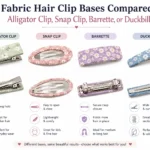
Hardware matters just as much as fabric. Alligator clips, snap clips, French barrettes, headbands, and claw clip bases all behave differently. For beginners, simple hardware such as snap clips or small barrettes is the safest place to start. Once you move into headbands or stronger clips, comfort testing matters more.
2.2 Essential tools for beginners
You do not need a full craft room to begin. A basic toolkit includes sharp fabric scissors, a measuring tape, pins or clips, hand-sewing needles, matching thread, a fabric marker, a ribbon edge sealer or lighter, and a hot glue gun for selective decorative steps. A sewing machine helps, but it is optional at the start.
The American Academy of Dermatology warns that repeated tension from tight styles can lead to traction alopecia, and it specifically recommends looser styling and gentler materials such as silk or satin under coverings.[5] That matters for DIY makers because “cute” is not enough. Hair accessories should grip without pulling, decorate without scratching, and secure hair without constant tension.
| Material or tool | Best use | Beginner tip |
|---|---|---|
| Satin or cotton fabric | Scrunchies, bows, soft wraps | Choose medium weight fabric that is easy to fold and stitch |
| Grosgrain ribbon | Structured bows and clip covers | Seal cut ends neatly to reduce fraying |
| Felt backing | Covering glue points and stiffening embellishments | Use a matching color to make the back look cleaner |
| Snap clip or barrette base | Easy clip projects | Test opening force before decorating |
| Elastic | Scrunchies and ponytail styles | Use soft, durable elastic that keeps shape after stretching |
| Hot glue gun | Decorative finishing, not structural load-bearing seams | Use sparingly and hide glue with felt or ribbon wrap |
2.3 How to control DIY costs
Cost control starts with project selection. Use one focused palette, standardize widths and clip sizes, and save premium embellishments for statement pieces. From a business angle, cost discipline is also about yield: one meter of ribbon should produce several bows, and scrap fabric should become mini scrunchies or sample swatches.
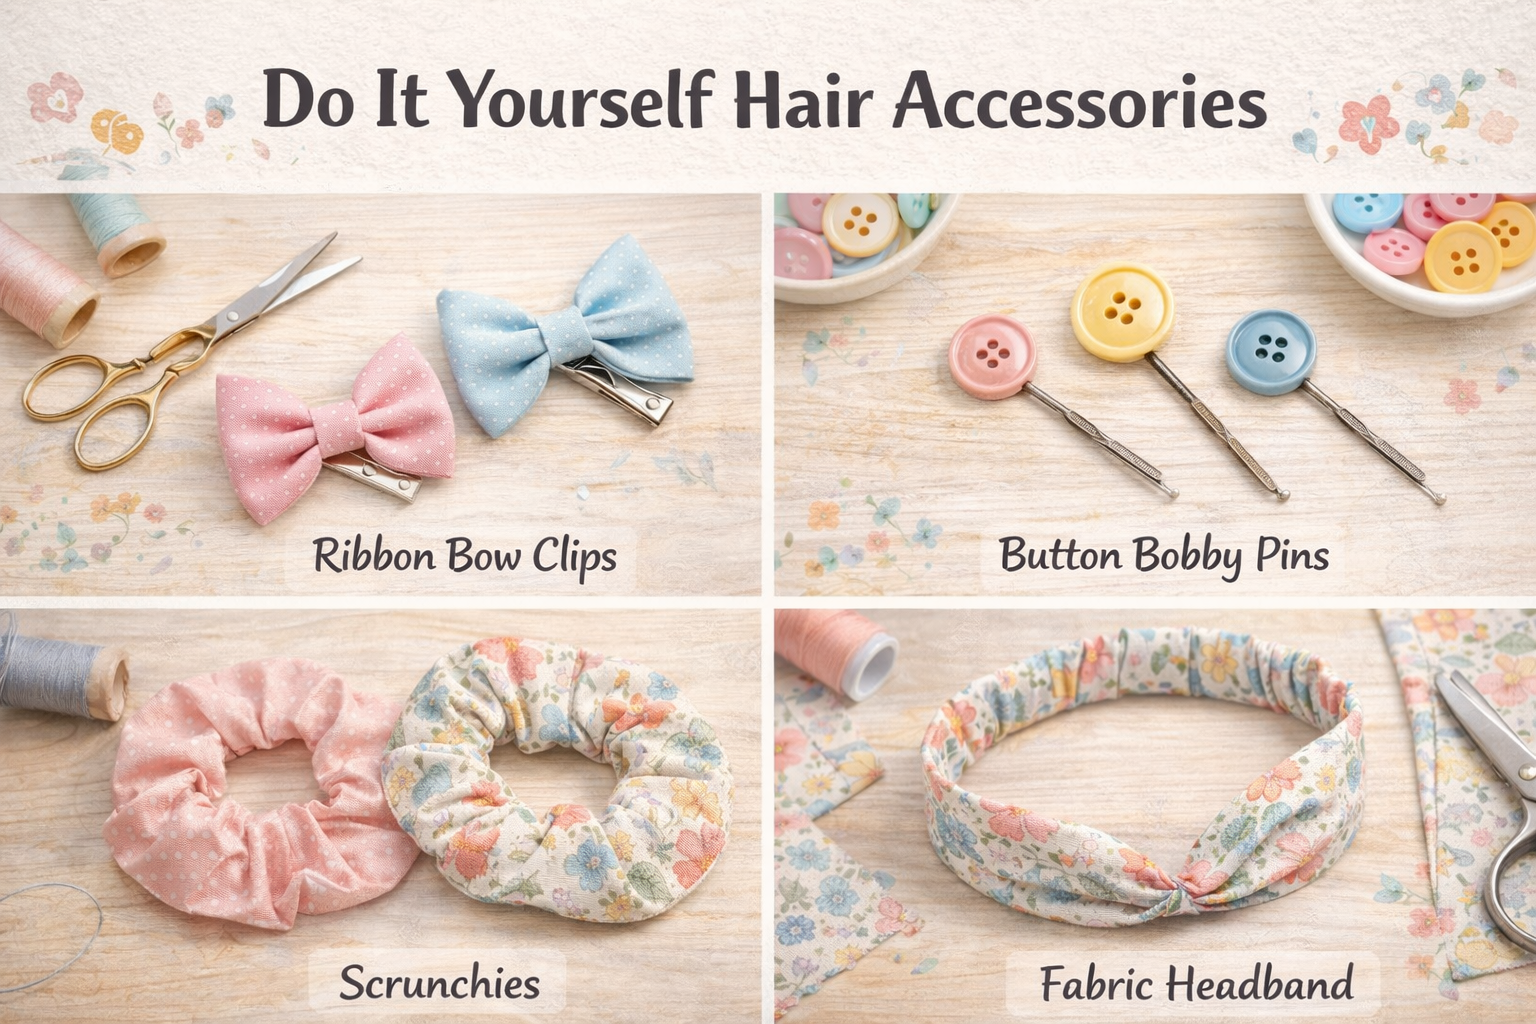
3. Easy DIY Hair Accessories for Beginners
3.1 How to make a basic scrunchie
If you only make one project first, make a scrunchie. It teaches proportion, seam accuracy, turning, elastic insertion, and finishing. It is also commercially relevant because elastics and ties are the largest product segment in the global hair accessories market.[1]
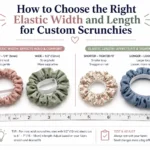
- Fabric strip: about 18–22 inches long and 3.5–4.5 inches wide, depending on fullness.
- Elastic: about 7–9 inches long for a standard adult scrunchie.
- Seam allowance: around 0.25–0.5 inch.
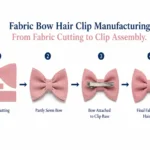
Fold the fabric lengthwise with right sides together, sew the long edge, turn the tube right side out, thread the elastic through, stitch the elastic ends together, then close the opening. Press the fabric first, match the thread closely, and avoid thick fabric on your first try.
3.2 Two other easy starter ideas
Once you can make a scrunchie cleanly, move to a ribbon bow clip and a pearl barrette. The bow teaches symmetry and placement. The barrette teaches embellishment discipline. Both are quicker than a padded headband and simpler than a custom claw clip.
| DIY style | Difficulty | Main skills learned | Estimated first-time making time |
|---|---|---|---|
| Scrunchie | Easy | Sewing straight lines, turning, threading elastic | 20–35 minutes |
| Ribbon bow clip | Easy | Measuring, folding, centering, heat-sealing ribbon ends | 15–25 minutes |
| Pearl barrette | Easy to moderate | Balanced decoration, adhesive control, backing | 20–30 minutes |
| Padded headband | Moderate | Wrapping, shaping, finishing ends cleanly | 35–60 minutes |
For trend direction, watch social discovery platforms. Pinterest’s 2026 trend forecast points to darker, more dramatic beauty looks, while Etsy’s 2025 reporting highlighted ribbon-tied hair.[6][4] For beginners, two low-risk directions are especially practical: soft ribbon details and moodier statement colors.

4. Step-by-Step: How to Make DIY Hair Accessories
4.1 Step one: choose the style and dimensions
Start by deciding what the accessory must do. Is it decorative, functional, or both? A narrow bow on a snap clip can be mostly decorative, while a scrunchie or headband needs comfort and repeatable size. Write down your target dimensions before cutting. Audience matters too: children’s accessories need softer edges, bridal pieces need cleaner finishing, and everyday styles need durability first.
4.2 Step two: cut and assemble the materials
Once your measurements are fixed, cut visible materials first, structural materials second, and backing last. Keep pieces grouped by style. Assembly should follow a clean order: build the visible form, secure the seam or center, attach to hardware, then cover the underside. Many beginners glue too early and only later realize the back looks unfinished.
Pros of sewing
- Stronger for daily use
- Cleaner finish on fabric styles
- Better for scrunchies, padded pieces, and repeat orders
Pros of glue-first methods
- Faster for embellishment testing
- Good for lightweight decorative clips
- Lower skill barrier for beginners
Best practice: sew the structure when possible, then use glue only for controlled decorative finishing.
4.3 Step three: secure the structure and test durability
Before calling a piece finished, test it. Open and close the clip several times. Pull the bow gently from each side. Stretch the scrunchie repeatedly. Check whether pearls rotate, thread ends show, or the center wrap shifts. The American Academy of Dermatology advises avoiding frequent tight styling and repeated scalp stress, so makers should avoid aggressive grips, bulky seams, or accessories that require constant tightening.[5]
5. How to Make DIY Hair Accessories Look Better
5.1 How to make them look more refined
Professional-looking DIY hair accessories do not come from expensive materials alone. They come from proportion and finishing. Keep your bow loops symmetrical, trim frayed edges, hide glue, and edit your design. One pearl accent often looks more expensive than ten scattered embellishments.
Consumers are becoming more selective and value-focused.[2] In practice, refined DIY accessories usually win over crowded ones.
5.2 Better color and material pairing
Material pairing changes the mood of an accessory. Satin plus pearl reads dressy. Cotton plus grosgrain reads playful. Velvet plus metal reads rich. Linen plus raw-edge ribbon reads artisanal. When in doubt, choose one hero material and one supporting detail.
| Style goal | Best material pairing | Visual result |
|---|---|---|
| Everyday minimal | Matte cotton + simple barrette | Clean, wearable, practical |
| Gift-worthy feminine | Satin + pearl detail | Soft, polished, romantic |
| Holiday or party | Velvet + gold-tone clip | Richer and more elevated |
| Trend-led youthful | Ribbon + printed fabric accent | Playful and social-friendly |
| Natural handmade | Linen + felt backing | Craft-driven and artisanal |
5.3 Everyday use vs gift-ready finish
Accessories for daily wear should prioritize comfort and resilience. Gift-ready or special-event pieces can lean harder into volume and shine. Experienced makers often build three groups instead of random items: everyday, occasion, and personalized gift pieces.
Grand View Research notes that personalized hair accessories are gaining popularity as shoppers seek unique items that reflect their style, and it cites products such as monogrammed scrunchies, clips, and headbands as examples of the customization trend.[1] That is a useful strategy for small makers: the easiest way to make a simple design look more premium is often not adding more decoration, but making it more personal.
6. Common DIY Mistakes and How to Avoid Them
6.1 Why DIY hair accessories come loose or fall apart
The main reason handmade accessories fail is that makers use decorative methods where structural methods are needed. Glue is not a substitute for construction. If the piece must stretch, flex, or carry tension, the core structure should be stitched or securely wrapped first. Another common problem is scale mismatch: heavy decoration on weak hardware will rotate, slide, or lose shape.
6.2 What to do about exposed glue and uneven edges
Visible glue instantly lowers perceived quality. Use less than you think you need, apply it in small dots, let it set, and cover the contact area with felt, ribbon, or a clean backing strip. One useful rule: every front view should have an acceptable back view.
6.3 Small details beginners often ignore
Beginners usually focus on style and forget wearability. But experts know that hair accessories succeed when they balance beauty with comfort. The American Academy of Dermatology warns that repeated tight tension can contribute to traction alopecia and recommends looser alternatives and gentler practices.[5] That is why these details matter:
- Do not use hardware that pinches painfully.
- Do not overload the front so the piece tips forward.
- Do not place sharp beads or stiff seams where they touch the scalp.
- Do not choose elastic that forces users to wrap too tightly.
- Do not skip wear testing on different hair types.
- Open and close the clip 10 times.
- Pull the decorative section gently from three angles.
- Check the back view for exposed glue, rough felt, or crooked placement.
- Try it on hair and confirm it holds without pain.
- Photograph it in daylight. The camera reveals asymmetry quickly.
7. Why Bulk Selling Usually Is Not Ideal for DIY
7.1 When handmade stops being efficient
DIY is excellent for learning, prototyping, gifting, content creation, and small-batch testing. It is usually not the best long-term model for bulk selling. Once orders grow, handmade production creates pressure on consistency, labor time, unit cost, and replenishment speed.
Market reality matters too. Grand View Research shows the category is large, growing, and increasingly shaped by professional brands, retail partnerships, and distribution expansion. Recent examples include Goody’s 2025 collaboration with LoveShackFancy and Claire’s expansion to more than 4,400 Walgreens locations in the U.S.[1] Product appeal matters, but supply reliability matters too.
| Factor | DIY handmade | Factory production |
|---|---|---|
| Design flexibility | Very high for early testing | High after tech pack and sample approval |
| Consistency across units | Harder as quantity grows | Much easier with standardized production |
| Cost at low quantities | Can be efficient for samples and micro-batches | Usually better at scale |
| Speed for repeat orders | Limited by your own labor | Better for replenishment and growth |
| Custom branding and packaging | Possible but time-consuming | More systematic and scalable |
7.2 When it makes sense to work with a manufacturer
If you have proven demand, need wholesale pricing, want custom logo packaging, or plan to sell across multiple channels, it is usually smarter to move from DIY to factory-supported production. A factory can standardize color, hardware, sizing, and packaging while you focus on product direction and brand building.
If your handmade concept is turning into a product line, you can move from one-off DIY hair accessories to custom bulk development through a specialist manufacturer. Explore custom hair accessories manufacturing at QN Beauty or use the site as an internal brand link when adapting this article for your own publishing workflow.
Conclusion: DIY Hair Accessories Are a Smart Start, Not Always the Best Finish
DIY hair accessories are popular because they fit the way modern consumers shop and create: they want products that feel personal, useful, and trend-aware. The category is growing, elastics and ties remain a major product group, handmade goods still attract buyers looking for uniqueness, and DIY beauty behavior is increasingly intentional.[1][2][3]
The best DIY makers also know when to evolve. Start small. Learn proportion. Choose gentle materials. Test comfort. Improve finishing. Watch trend signals. Then decide whether your project should stay handmade, become a limited collection, or move into custom manufacturing.
Clear next step: Make one scrunchie, one bow clip, and one embellished barrette this week. Compare the finish, comfort, and time required. That mini test will teach you more than buying more supplies ever will. And if you are ready to turn your ideas into a repeatable product line, add an internal link to https://qnbeauty.com/ as your manufacturing CTA.
Expect the next wave of hair accessories to lean further into personalization, trend micro-aesthetics, soft materials, mood-based color stories, and products that balance style with gentler wear. That direction is supported by category growth data, consumer intentionality, and platform-led trend forecasting across beauty and accessories.[1][2][6]

FAQ
What are the easiest DIY hair accessories to make?
The easiest styles are scrunchies, ribbon bow clips, and simple pearl barrettes. They require fewer materials, teach useful core skills, and are forgiving enough for first-time makers.
What materials do I need for DIY hair accessories?
Start with fabric or ribbon, elastic, hair clip bases, felt backing, thread, scissors, a measuring tape, pins, and a glue gun for decorative use. Add embellishments only after you can finish basic shapes cleanly.
Can beginners make hair accessories at home?
Yes. Most beginners can make a basic scrunchie successfully on their first attempt if they keep the fabric simple, cut accurately, and follow a clear sequence.
How do I make DIY hair accessories look professional?
Focus on symmetry, clean edges, matching thread, hidden glue, balanced embellishment, and a neat back side. Good finishing usually matters more than expensive materials.
Are DIY hair accessories cheaper than buying them?
They can be, especially if you already own tools and make several pieces from the same materials. For one-off projects, savings may be smaller than expected, but the personalization value is much higher.
Are DIY hair accessories safe for daily use?
They can be safe when they fit well, avoid sharp edges, and do not pull too tightly. Comfort testing is essential. Tight tension and repeated pulling can contribute to hair damage or traction alopecia over time.[5]
When should I switch from DIY to factory production?
Switch when you need repeat quality, better unit costs at scale, branded packaging, or faster turnaround for wholesale and restocking. DIY is excellent for prototypes; factories are better for stable growth.
References
- Grand View Research, Hair Accessories Market Size, Share, Industry Report, 2033. Suggested outbound URL: https://www.grandviewresearch.com/industry-analysis/hair-accessories-market
- Euromonitor International, Beauty Consumer Trends: Key Insights from the Voice of the Consumer Survey, 2025. Suggested outbound URL: https://www.euromonitor.com/article/beauty-consumer-trends-key-insights-from-the-voice-of-the-consumer-survey
- Grand View Research, Handicrafts Market Size and Share, Industry Report, 2030. Suggested outbound URL: https://www.grandviewresearch.com/industry-analysis/handicrafts-market-report
- Etsy Seller Handbook, Seller Trend Report: Spring and Summer 2025. Suggested outbound URL: https://www.etsy.com/seller-handbook/article/1362959156542
- American Academy of Dermatology, Hairstyles that pull can lead to hair loss. Suggested outbound URL: https://www.aad.org/public/diseases/hair-loss/causes/hairstyles
- Pinterest Business, Pinterest Predicts 2026. Suggested outbound URL: https://business.pinterest.com/pinterest-predicts/